Contents
Working Principle
Working Principle
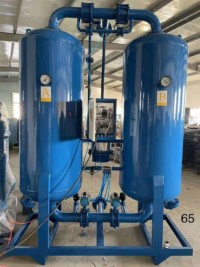
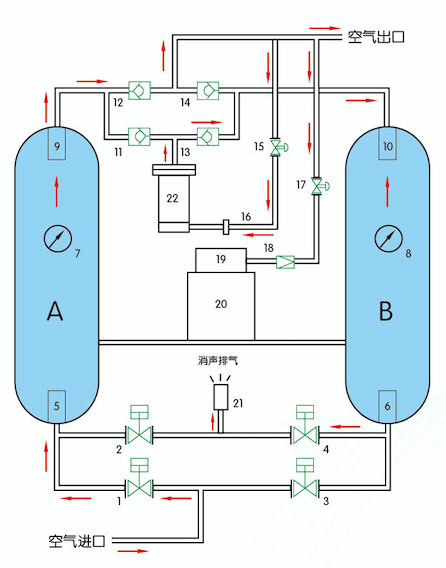
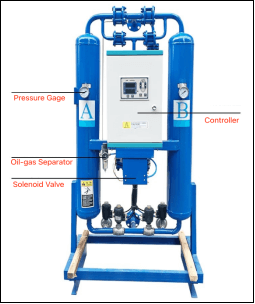
The desiccant compressed air dryer dries compressed air according to the principle of variable pressure desiccant. Under certain pressure, the compressed air flows through the adsorbent (drying) bed from bottom to top.
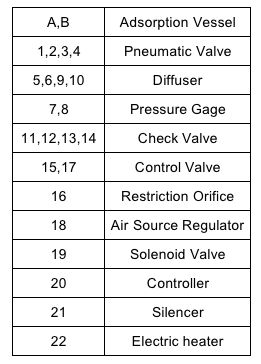
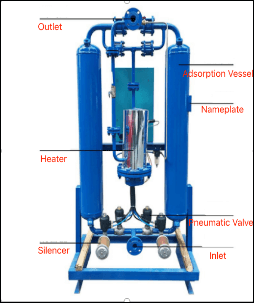
Desiccant air dryers consist of two pressure vessels, which are both filled with desiccant (alumina and molecular sieves) and are alternately operated via switch-over.
The wet compressed air flows through a vessel, under high pressure and low temperature, the moisture is thoroughly removed by the desiccant (desiccant), so the compressed air will be dry. At the same time, the moisture stored in the desiccant of the second vessel is removed (regeneration) with low pressure, so the desiccant is regenerated. If the desiccant in the vessel in which desiccant takes place is saturated with moisture, the vessels are switched and the process starts again. One complete run of desiccant and regeneration in a vessel is called a cycle, and the time required is the cycle time. The switching period is 120~240 minutes (can be set separately as needed), and the action will be displayed on the front panel of the controller.
This series of heated desiccant compressed air dryer adopts an intelligent controller with advanced microcomputer technology to control air-drying process automatically, improve the air purification effect and reduce power loss.
Flow Chart
Flow Chart
Installation
Installation
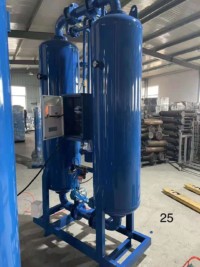
- The user pours the concrete foundation according to the size of the equipment and needs the ground screws to fasten, the equipment shall be placed in a ventilated place indoors (at least 1meter from the wall)
- When installing the equipment, attention should be paid to the versatility of the barrel.
- The equipment shall be fastened firmly, and shall be fastened again after a period of use.
- Install the pipeline as straight as possible (many elbows will cause some loss to the flow and pressure of the equipment).
- To ensure safety, non-safety voltage electrical parts, etc. should be effectively grounded. Grounding requirements are as specified.
- The pipe height must be lower than the outlet height of the equipment, otherwise it will cause part of the liquid back flowand affect the regeneration effect. It is necessary to prevent rainwater and so on from entering.
Commissioning
Commissioning
Pre-commissioning preparation
Check each running part, instrument control system, intelligent controller, grounding unit, etc. before commissioning, if damaged, out of order, should be repaired.
Several related valve adjustment
- Adjust the starting pressure of safety valve to 1.05 times of the inlet pressure.
- Adjust the pneumatic shut-off valve for the operation of the inlet pressure of 0.3 ~ 0.5 Mpa (factory has been adjusted)
- Adjust the ball valve Q, so that the regenerated gas volume of about 4 ~ 6%.
- Switch the valve inlet pressure needs to be adjusted, first pull up the regulator on the knob, and then left (reduce) or right (increase) to adjust the finished press down the knob.
How to Use the Desiccant Air Dryer?
How to Use the Desiccant Air Dryer?
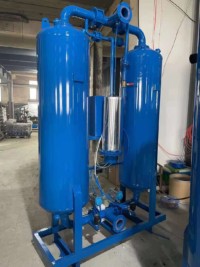
- This device should be used in the room that with no danger of explosion, with no media that may cause corrode the metal.
- As the pneumatic working pressure of the pneumatic shut-off valve is 0.3~0.5Mpa, the pressure gauge indication on the filtering pressure reducing valve should be checked frequently to prevent damage to the cylinder by over pressure.
Maintenance of Desiccant Air Dryer
Maintenance of Desiccant Air Dryer
- After long-term operation, when the operating parameters of the drying system remain unchanged and the equipment works normally, but the dry air cannot reach the dew point requirement, that is, the desiccant has failed and needs to be replaced and updated.
- When the regenerated desiccantcylinder discharges exhaust gas, its pressure should be ≤05Mpa. If the pressure exceeds this value, the muffler should be removed to clear the dust. Make the gas flow resistance small, replace the cartridge or muffler if necessary, generally the exhaust pipe and muffler should be connected to the outdoor, especially the inlet volume flow is less than 10m³ must be connected to the outdoor, but the pipe must be lower than the regeneration outlet height.
- Pay attention to the maintenance of the safety valve.
- The two desiccantcylinders should be inspected regularly according to the pressure vessel testing procedures.
- Manual drainage at least 1-2 times per shift
- This equipment needs to be grounded effectively as required.
- The intelligent control instrument must often clean dust (pay attention to first cut off the power supply) and regularly check whether the rear panel plugs and plugs are well connected, and promptly repair any faults.
- maintenance, must cut off the power supply (including the power into the controller) to avoid unnecessary injury.
- Switching valve The dryer adopts double cylinder switching to complete the adsorbent desiccantand regeneration so that the cycle alternates. The switching valve is the most frequent and important part of the machine, therefore, daily maintenance should be paid attention to. There are 4 pneumatic valves on the dryer, 2 normally open type and 2 normally closed type, which are strictly debugged at the factory, generally speaking, there should not be any problem with the machine itself, the valve control gas inlet pressure is required to be 0.3~0.5Mpa, if it is too small, the operation will fail. In addition to this, there is still a failure, please check the control system first, such as power supply, solenoid valve, controller, etc. is normal.
Failures and solutions of Desiccant Air Dryer
Failures and solutions of Desiccant Air Dryer
| No. | Failure | Reason | Solution |
|---|---|---|---|
| 1 |
The intelligent controller does not work |
1.1 No power output, loose terminal 1.2 No output at all or part of the output 1.3 Wrong wiring at the output 1.4 Too much voltage fluctuation |
1.1 Check the power cord and fuse 1.2 Correct the wrong wiring 1.3 Correct the wrong wiring 1.4 Regulated power supply |
| 2 |
Dew point does not meet the requirements |
2.1 Insufficient or broken adsorbent, failure 2.2 Insufficient regeneration gas volume 2.3 Inlet temperature is too high 2.4 High oil content in the inlet gas and adsorbent failure 2.5 Low working pressure to make the desiccant capacity low 2.6 Failure of switching valve 2.7 Muffler outlet is higher than the equipment regeneration gas outlet |
2.1 Add adsorbent or replace 2.2 Adjust to reasonable gas volume 2.3 Adjust the process configuration and improve the cooling effect of the cooler 2.4 Improve oil filtering effect and replace adsorbent 2.5 Increase inlet pressure appropriately 2.6 Repair 2.7Lower muffler outlet height |
| 3 |
Large pressure drop (more than 3% of inlet pressure) |
3.1 Severe damage of adsorbent 3.2 Filter clogging 3.3 The adsorbent is overdue or has been broken into dust prematurely |
3.1 Clear broken adsorbent and replenish 3.2 Check and clean clogged filters 3.3 Sieve or replace adsorbent |
| 4 |
Large airflow loss |
4.1 The diameter of the air outlet pipe does not meet the requirements 4.2 Poor air outlet pipe 4.3 The volume of regenerated gas is too large 4.4 Too many pipe elbows |
4.1 Replacement 4.2 Clean and drain 4.3 Appropriate reduction of regeneration gas volume 4.4 Appropriate reduction of pipe elbows |
| 5 |
Regeneration pressure does not match zero or both tower pressures drop at the same time |
5.1 Muffler or filter pipe blockage 5.2 Switching valve malfunction or serious leakage 5.3 The regeneration gas volume is too large 5.4 The regenerative gas outlet pipe is not smooth |
5.1 Clean up the muffler (replace the cartridge) or clean up the anechoic pipe 5.2 Check and replace damaged parts (diaphragms, seals, etc.) 5.3 Reduce regenerative gas volume appropriately 5.4 Check the air outlet pipe, muffler, etc. |
| 6 |
Tower A, B Switching is not normal |
6.1 Intelligent controller failure 6.2 Wrong wiring at the output of the intelligent controller 6.3 The solenoid valve air hole is blocked or the valve spool is stuck by impurities or the spring is broken 6.4Failure of ball valve 6.5 Switching valve malfunction or serious leakage 6.6 abnormal voltage solenoid valve damage 6.7 Solenoid valve external wiring failure |
6.1 Check and troubleshoot 6.2 Adjust the terminals as required 6.3 Replace the solenoid valve and check if the filtering pressure reducing valve fails 6.4 Replace 6.5 Check and replace broken parts (such as diaphragm rupture) 6.6 Check the power line and replace the solenoid valve 6.7 Check the connection to the intelligent controller line or check the relevant part of the intelligent controller
|
| 7 |
Absorption drying Vessel (double or single) work out of order |
7.1 Solenoid valve malfunction 7.2 Damaged switching valve 7.3 Check valve is damaged |
7.1 Solenoid valve damage replacement 7.2 Check and replace the damaged film shut-off valve film, valve head, spring, seals, etc. 7.3 Clean and replace damaged parts |
| 8 |
Absorption drying cylinder leakage |
8.1 Exhaust valve malfunction |
8.1 Replace |
| 9 |
Temperature display failure |
9.1 Propagation gas damage 9.2 Loose sensor contacts 9.3 Poor contact 9.4 Heating temperature exceeds the specified degrees |
9.1 Replace 9.2 Repair 9.3 Repair 9.4Lower intake air temperature |
Spare Parts
Spare Parts
Replace Alumina and molecular sieve every year. Other valves for backup.
| No. | Name |
Position |
|---|---|---|
| 1 |
Solenoid valve |
Between intelligent controller and switching valve |
| 2 |
Pneumatic valve |
Bottom of the dryer |
| 3 |
Filter element |
Silencer |
| 4 |
Filter pressure reducing valve |
Between the inlet and solenoid valve |
| 5 |
Check valve disc |
Check valve |





Leave A Comment